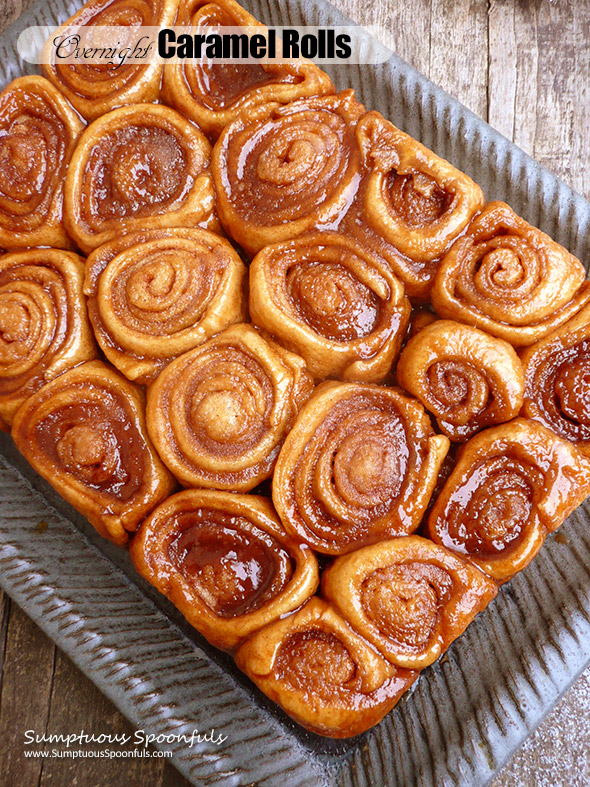
There’s nothing quite like waking up to fresh hot homemade caramel rolls. When I was little, my grandma (on my mom’s side) used to make caramel rolls. Most everything else she made was awful, but her caramel rolls were amazing.
Fast forward to today … my daughter had a sleepover for her birthday … she always has a sleepover for her birthday. There is always much mom-cooked food involved. She wanted homemade caramel rolls for breakfast. But what we’ve noticed at past sleepovers, if we try to make caramel rolls in the morning, they aren’t done in time for breakfast (and even though they are teenagers, they start leaving in the morning, as their parents come to pick them up … and they are pretty much all gone by noon).
I thought about this conundrum and remembered that if you put yeast dough in the fridge after shaping it, it slows down the rising so you can actually (more quickly) rise and bake them in the morning. Yes! This was the answer. I proposed it to the daughter and she very much approved.
So on the day of the party, after the kids had dinner, I made the dough. Rolled out the dough. Microwaved the caramel sauce. Poured the caramel into the pan. Cut the rolls and set them in the pan. Covered the pan and set it in the fridge. CRASHED! I was sooo freaking tired. There was little sleep that night though, because teenagers were up most of the night, chatting, while I silently cursed them in my bedroom … but said nothing out loud.
In the morning, I felt quite clever. I turned on the oven to 170 F. then turned it off. Set the pan in the oven. Let the rolls finish rising. Set the oven to 325 to bake the rolls, pulled them out of the oven, flipped them over and voila! I had fresh-baked caramel rolls ready by 9:30 am., in time for me to rush off to yoga and perfectly timed for the kids to enjoy before they left.
By the time I got home from yoga, they had eaten all but four of the rolls and all but one of the guests had departed. I couldn’t believe how many rolls they ate while I was gone! I guess they were a hit. I indulged myself and had a bit of one. OMG, SO good. Happy birthday, dear daughter mine. 🙂
To make these homemade caramel rolls, you will need: a stand mixer with a dough hook (or willingness to hand-knead the dough), a 13 x 9 x 2 inch pan, a silicon brush (or other cooking brush), a rolling pin and a baking sheet or serving tray that’s larger than the 13 x 9 x 2 inch pan.
Print
Overnight Caramel Rolls
- Prep Time: 45 minutes
- Cook Time: 50 minutes
- Total Time: 10 hours
- Yield: 6 - 12 servings 1x
Ingredients
For the dough:
- 1 1/3 cups warm water (90 – 100 F)
- 1 Tablespoon active dry yeast
- 2 Tablespoons melted butter
- 1/3 cup brown sugar
- 1 teaspoon salt
- 1 egg
- 2 cups bread flour
- 2 cups whole wheat flour
- 1 t. cinnamon
- 1 t. vanilla
For the caramel sauce:
- 1 cup brown sugar, packed
- 6 Tablespoons butter
- 1 teaspoon cinnamon
- 1–2 Tablespoons of water
- 1 teaspoon vanilla
For the middle:
- 2 – 4 Tablespoons melted butter
- 1 cup sugar mixed with about 2 teaspoons cinnamon and a pinch of salt
Instructions
- Spray a 13 x 9 x 2 inch pan with cooking spray. Preheat the oven to 170 F., then turn it off.
- Put the warm water in a small bowl with the yeast and a bit of the brown sugar (you don’t need much). Let it sit for 5 – 15 minutes or until the mixture gets fluffy and starts to expand.
- Put the rest of the dough ingredients in the bowl of a stand mixer with the dough hook. Mix a little on “2” speed until lightly mixed, then pour in the yeast mixture and mix on setting 2 for about 2 minutes, stopping and using a spatula to scrape the sides of the bowl and get everything incorporated. The dough should be coming together nicely … if it seems too dry, add a tiny bit more water.
- Remove the dough from the mixer, flip it over and mix again on 2 for 2 minutes. Spray with cooking spray (or brush the top with butter), cover with a clean kitchen towel and set in the warmed oven to rise for 40 minutes or so.
- Meanwhile, prepare the caramel sauce. Put the brown sugar, cinnamon and butter into a microwave-safe bowl and microwave on 50% power for 2 minutes or more until the butter is melted. Stir together to mix, then add 1 Tablespoon of the water and the vanilla. If the caramel sauce looks too thick, add a bit more water. Pour the sauce into the prepared pan and spread it around to cover the bottom of the pan.
- When the dough has doubled in size, roll it out into a large rectangle on a floured surface. Let it rest a bit after rolling it out, then roll out a little further.
- Brush the dough with melted butter, then sprinkle with cinnamon sugar.
- Roll the dough up to make a long log, then use dental floss to cut the log into individual rolls (see this post for step-by-step photos).
- Set the rolls in the prepared pan with the caramel sauce on bottom. Spray the tops with cooking spray. Cover and refrigerate overnight. The rolls will start to rise, but very slowly.
- In the morning, preheat the oven to 170 F., then turn it off. Set the rolls in the oven to rise, covered with a clean towel, for about 40 minutes. When they have risen to a good size, remove the towel and set the oven to 325 F. Cover loosely with aluminum foil to keep from over-browning and bake for 20 – 25 minutes, then remove the foil and bake for another 20 – 25 minutes or until the rolls are nicely golden brown.
- Remove from the oven, immediately cover the pan with a baking sheet or serving tray that is larger than the pan they baked in and (with oven mitts on both hands) and grab the pan and tray firmly in both hands. Flip over so the caramel sauce sinks down onto the fresh, hot rolls. Let cool slightly and enjoy!
Notes
Allow for rising and baking time in the morning.
RECIPE SOURCE: http://www.sumptuousspoonfuls.com/
© Copyright 2018, Sumptuous Spoonfuls. All images & content are copyright protected. Please do not use my images without prior permission. If you want to publish any of my images, please ask first. If you want to republish this recipe as your own, please re-write the recipe in your own words or link back to this post for the recipe.


5 comments
what a lovely way to wake up to this amazing smell these must have while cooking then to sink your teeth into something so decadent for breakfast! yum it written all over these!
I remember having these for most special occasions, when growing up. Must make these. Been a long time.
I’m just dying to unroll one of of those babies right into my mouth! They look amazing, Ann, and I love your shortcuts… I’ll have to try those tricks for our family breakfasts! 🙂
Puhhhleeeeeze, Miss Ann…you’re killin’ me softly w/this recipe! OMG, please send overnight! xo
Sure would love to have some of these.